| Q1 |
How can a drill chuck be removed from the spindle? |
| A1 |
We are often asked questions that a drill chuck or keyless chuck has “stuck to the arbor of the spindle and cannot be removed.” The way to remove it from the spindle varies according to the types of the drill chuck and
the mating machine. We will help you to remove it if the drill chuck or keyless drill chuck is sent to us together with the arbor. Therefore, contact the nearest tool shop or sales office of us. Also, when you remove it by
yourselves, do it as the following way. Besides, be careful enough not to hurt yourselves or damage the machine.
- When you use a drill chuck (tapered type) or keyless drill chuck, drive in a wedge-shaped jig into the space between the chuck and the taper in the spindle side, and separate them little by little from the state
in which they are adhered to each other.
- Be careful enough in removing them apart as there
may be some danger in this work.
|
| Q2 |
How can a drill chuck be replaced? |
| A2 |
When you replace a drill chuck or multi keyless chuck attached to your electric drill or air drill, note that the chuck may be fixed to the spindle from inside with a set screw, especially when you use an electric drill. First,
open the 3 jaws of the drill chuck and remove the set screw that fixes the chuck and the spindle from inside of the center of the chuck. This set screw can be removed by being turned clockwise as it is left-hand threaded
so as not to be loosened in forward rotation during operation. Then, remove the drill chuck from the drilling machine. As the thread part of the drilling machine is right-handed, the chuck can be loosened by being turned
counterclockwise. In case the drill chuck is not loosened even if you grab its circumference by hand and turn it, it may be loosened by ejecting the 3 jaws, having them hold one end of an L-shaped hex key, and turning the
key. When you try to do this way, be sure to fix the drill chuck in some way. Otherwise, it will rotate together with the chuck. Also, when you set a new drill chuck, do it in the reverse way shown above. The thread size of
drillchucks is classified into two, namely, 3/8-24UNF and 1/2-20UNF. Replace the existing drill chuck with the one that has mounting thread of applicable size. When you would like to know the details of the way to fix
the chuck, we recommend to contact manufacturers of electric tools as the way varies according to the model of the electric drill or the air drill.
|
| Q3 |
Is it possible to disassemble and repair a drill chuck? |
| A3 |
Drill chucks are assembled by having the parts press-fitted and there may be a danger in disassembling. Therefore, be refrain from disassembling them by yourselves. It is possible to have the drill chuck returned
to and repaired by us, but it will be rather inexpensive to purchase a brand-new chuck taking into accounts the parts and repair fee and freight cost.
|
| Q4 |
The chuck comes off from the spindle. How can it be solved? |
| A4 |
When the mating spindle is tapered, the drill chuck or the keyless drill chuck is adhered to it with surface pressure of the tapers. Coming off occurs when this adhesion is not sufficient. As this cause may be dusts
stuck to the tapered part, wipe the tapered part of the drill chuck or keyless drill chuck and that of the spindle with some clean cloth. After wiping the part, fit the tapered parts together. When doing this, drive in the
chuck lightly upward with a wooden or plastic hammer having the 3 jaws stored into chuck body completely. Do not use a steel hammer to drive in the chuck as it may hurt the chuck. In addition, when the tapered part
has some rust or minor scar on it, the chuck may come off due to insufficient adhesion of the tapered parts. It is possible for us to modify the scar on the tapered part of the drill chuck or the keyless chuck if it is returned
to us. However, it may be rather inexpensive to purchase a brand new chuck taking into accounts the repair fee and the freight cost.
|
| Q5 |
How can a drill chuck be mounted on the spindle properly? |
| A5 |
As for the way to mount a chuck, follow the way written in the instruction manual and mount it firmly. Insufficient mounting may cause accidents or bodily injuries.
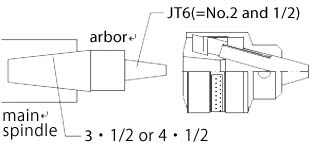
- In case of drill chucks (tapered type)
| 1) | Wipe out the dusts and oil on the tapered part completely. |
| 2) | Draw in the 3 jaws of the chuck so as not to have them project from it. |
| 3) | Wipe out the tapered part of the mating spindle or the arbor completely. |
| 4) | Insert the chuck to the tapered part without hurting it and drive in the end of the chuck with a wooden hummer to prevent it from slipping or coming off. |
- In case of keyless drill chuck (tapered type)
| 1) | Wipe out the dusts and oil on the tapered part completely. |
| 2) | Insert some mild steel bar to the end of the inside of the chuck and have it chucked. |
| 3) | Wipe out the tapered part of the mating spindle or the arbor completely. |
| 4) | Insert the chuck into the tapered part without hurting it and hit the tip of the mild steel bar with a hummer to prevent the chuck from slipping or coming off. At that
time, never hit the jaws or the sleeve. |
- In case of drill hucks (threaded type)
| 1) | Draw in the 3 jaws of the chuck so as not to have them project from it. |
| 2) | Screw in the chuck to the threaded part of the spindle firmly. When the chuck is of forward-reverse rotation specifications, the chuck need to be retightened by
having it chuck a hex key with the 3 jaws and hitting it with a hummer. |
| 3) | Confirm the end of the chuck touches that of the spindle. |
| 4) | When the chuck is a type fixed with a counter-shank head bolt, insert a bolt from inside and fix the chuck firmly. Sometime, this bolt is left-handed. |
|
| Q6 |
The jaws of the chuck became unable to open or close. How can it be solved? |
| A6 |
- In case of drill chucks
The question “the jaws of the drill chuck became unable to open or close” is often asked to us. The most possible cause of this problem may be chips entered the inside of the drill chuck when it is air-blew, which resulted
in “jamming” to prevent the jaws from opening or closing. In such a case, remove the chips inside by cleaning the inside of the drill chuck with something like cotton swab or hitting it lightly with a wooden or plastic
hammer. When doing this, be careful enough not to hurt the product.
- In case of keyless drill chucks
One of the causes of jaws of a keyless drill chuck that became unable to open or close may be the tool gripped by the chuck has caught it. Or, the end of the tool may catch the bottom of the chuck. In such a case,
it is possible for us to repair it by disassembling it and replacing the parts, so contact the nearest tool shop or branch office of us.
|
 YUKIWA SEIKO INC Japan